Friday, July 24, 2015

A PINK Patio Table? NOPE - It's CORAL!

My backyard needed color and fun - this picture was my inspiration:
Whatever by Meg Deurksen
So in May I posted on FB that I wanted advice on what color I should paint the boring and grimy patio table set that we had.  I put out these three colors to get votes:
Coral, Yellow and Aqua
Our house is blue so I was naturally drawn to the other blue in the group, even the yellow but hands down everyone shouted CORAL!  So I did it - and six or seven cans of spray paint later here is how it turned out:


I used Rustoleum Painters Touch 2x Ultra Cover in "Coral Gloss".  
The pillow cover fabric is indoor/outdoor fabric from fabric.com and is called Premier Prints Indoor/Outdoor Vertical Strip Black.  The silver tray was a recent WalMart find and the glass pitcher is from Crate & Barrel.  


Thursday, January 22, 2015

My First Chalk Painting Experience

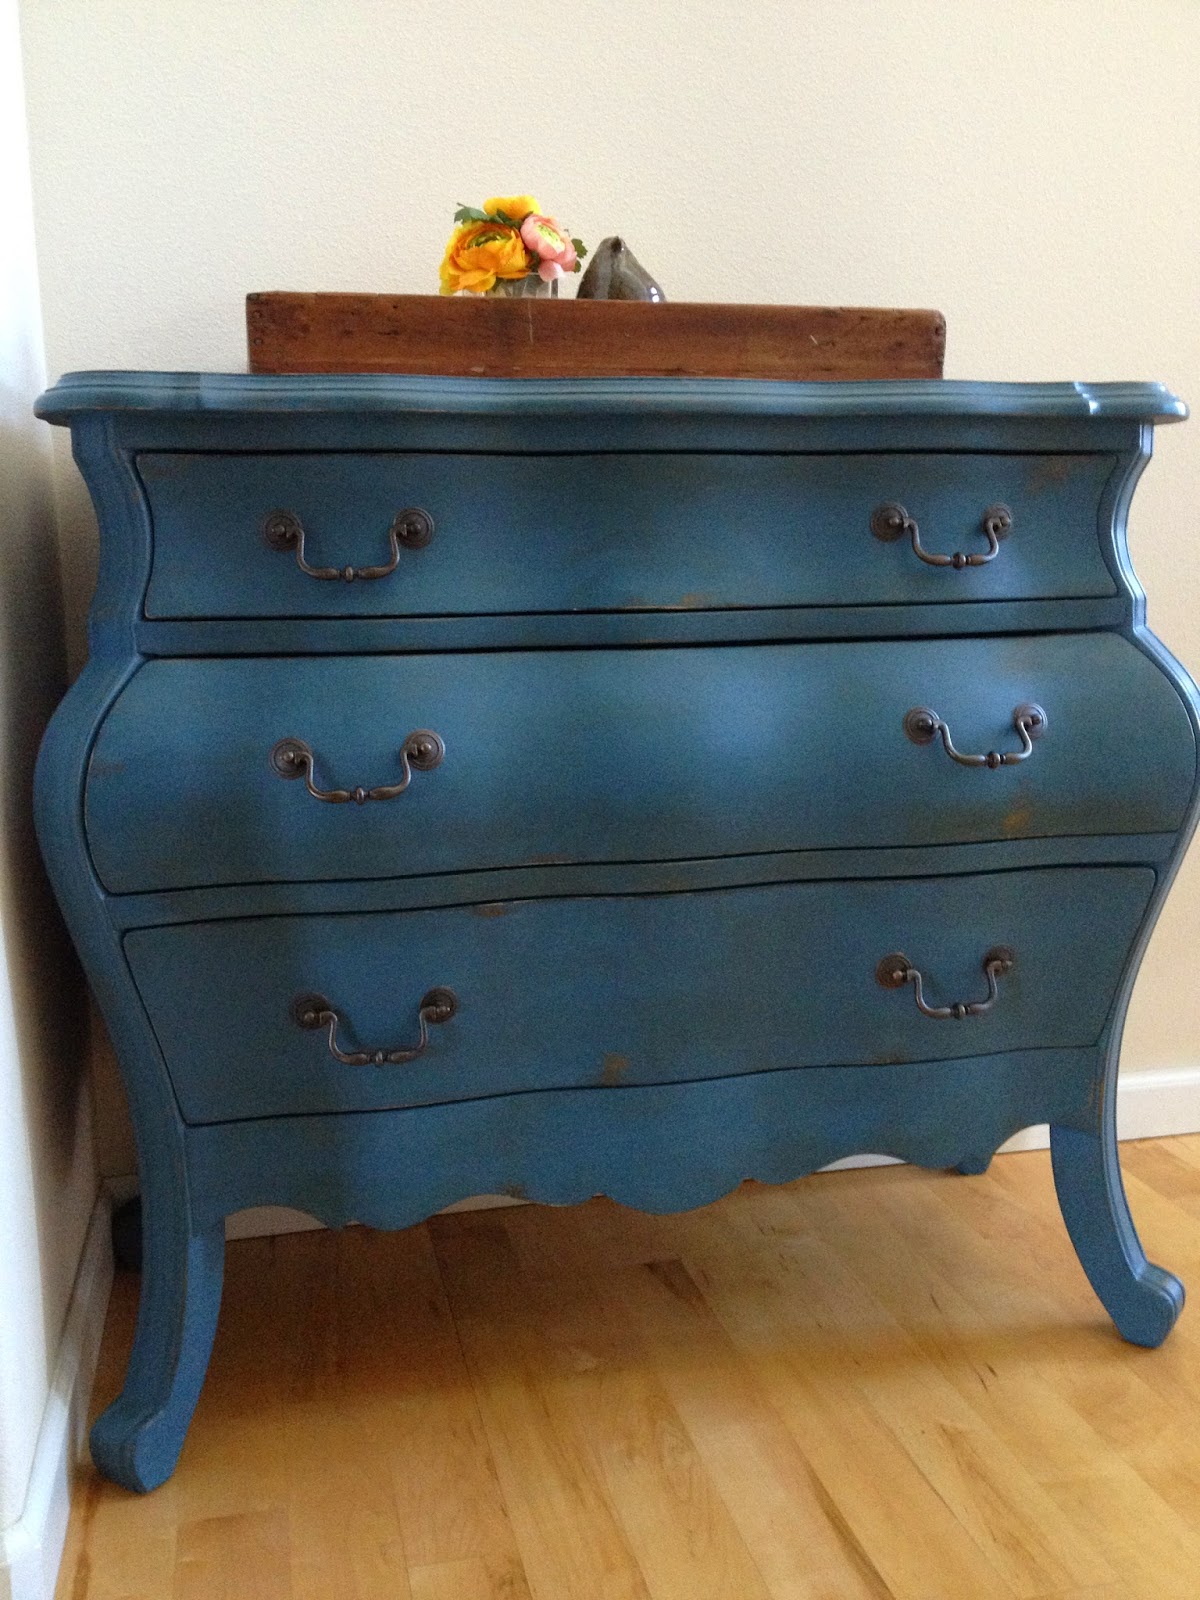
My entryway is probably like a lot of your entryways - tall ceilings, plain walls and feels cold all the time?  Ok, maybe it's just me that's cold all the time but I knew it was definitely on my list of places to spruce up in our house from the beginning.  I'm happy to say that it's just about done and I'm really happy about that.  One of the main items that I was hoping to get for the space was a dresser - something simple to have right outside of our main coat closet that could store some extra things like coloring books or board games or hats/mittens.  I finally found the PERFECT dresser last September and it was only $30 at a garage sale - MAJOR score!  I'd been looking for something that needed some paint love and although the dresser I found wasn't awful (it was slightly distressed) it was the WRONG color - green.  Yes, I like a good green too but this just wasn't it.  So the hunt was on to figure out a color and finally break down and buy the chalk paint - that stuff is expensive y'all!  I ended up purchasing Aubusson Blue by Annie Sloan and clear wax.  The awesome owner of "The Rusty Chandelier" in downtown Oak Harbor, WA even let me buy a small amount of dark wax to try too!  I'm super happy with how it turned out and even more excited to paint more items in my house! ;)

Here's a look at the finished piece:
this was how the dresser looked before I did the wax and distressing
and in it's rightful place - by the closet!  I don't know if I'm using it to it's full potential at the moment - the top drawer has odds & ends, the second drawer my hats, scarves and gloves and the bottom drawer has the world's largest collection of coloring books.... or maybe it just feels that way to me.  ;)


looking from inside our front door....

some up close peeks at the distressing

I had all the original hardware but one broke when we were putting them back on the drawers!   Doh!  SO - I ended up ordering new hardware which wasn't too bad - they were only about $4 a piece but I was still bummed I had to get them.  Overall though - this dresser makes me happy and I love the color!  What do you think?

Friday, October 24, 2014

Our Updated Laundry Room

Of coursed I'm only now realizing that I never took before pictures of our laundry room!  Bummer.  Well, it wasn't that it was awful - it just needed sprucing up!  And color - it definitely needed some color.  I ended up using some of the leftover paint from our dining room which is Benjamin Moore's Wedgewood Gray.  I love it in that room and I really like how it prettied up our laundry room too.  :)


Benjamin Moore Wedgewood Gray

There was the standard wired shelf that was above the washer and dryer and it was so high for my short self so my first idea was to rip that out and add in more shelving - simple right?  NOPE.  :(  The shelving ended up being REALLY nailed in so I ended up with some big holes in the drywall.  Thankfully we have a FANTASTIC handy friend, Miss Bonnie who came to my rescue!  She's a painter and because it was the 'off-season' for her she was available to help me do what I wanted!  She met me at Home Depot and helped me buy the right supplies to build shelving then she let me work with her to patch the holes, then I painted then she came back to the house to help me install the new shelving.  It was a great learning experience for me!

I'm really happy with how everything turned out - this is my first time having a second floor much less the laundry room on the second floor.  And a sink in the laundry room?  So fantastic!  Here's how everything ended up coming together:
Bonnie helped me to add a shelf above the washer and dryer that I could reach easily.  We also added a second shelf above it for additional storage.  The baskets hold items like lightbulbs, extra cleaning supplies, my Shark Mop attachments and more!
having a 'closet rod' in here was such a great idea!  I can hang up delicates to dry over the sink when I need to and it saves a ton of space having it above the sink!  (yellow knobs on cabinet: hobby lobby)
the cutest little printable I found online - when I'm on my third load of laundry for the day I'm not sure how much I believe this though!  :)
I dispense my laundry detergent and Oxi-Clean into plastic airtight bins and added chalkboard labels to keep them straight.  Clothespins are in the lidded jar and dryer sheets in the wire basket.  Most of the baskets and 'decorative items' were found at Home Goods.  Love that store!
There's plenty of room between the washer and dryer for this handy rolling cart and my stand up drying rack.  The rolling cart and the clock below were found on Zulily.

I made the little valance to go above the window - it's just the perfect amount of color to soften the room.  :)  The fabric is a really pretty mustard color that I found at JoAnne's.
I've been eyeing these huge clothespins for a couple of years now - they're from Ballard Designs and such a fun bit of whimsy in the room.  The ironing board cover is from Target.
One of my FAVORITE parts of this room is this rug!  I was going to get a chevron print but when I saw this on Overstock, I knew that the colors were perfect!  I got it for a great price too and it's holding up really well!

Have you redone your laundry room recently?  I was so inspired by all the great ideas out there on Pinterest.  I just love going into this room (despite how much I laoth doing laundry) and feeling like it's a 'pretty space' that's super functional too.  A special shout out to Bonnie for all your help!  This room could've been a HUGE disaster after I put all those holes in the wall but you came in and not only helped me but taught me some great 'fix it skills' too!  Thanks!!!

Friday, June 27, 2014

What I've Been Up To

I know, I know - it's been FOREVER since I've written here on this blog - I've been fairly good about updating our family blog but this one definitely falls to the bottom of my to-do list regularly.  It's not because I haven't been working on projects/crafts/etc.  I have!  Here's a peek into some of my recent projects:
Back in March I finally got around to cutting handbags out of all the fabric I had on hand.  I had quite the fun stash of great stuff!  You'll see that I've FINALLY gotten around to sewing some of these!  :)
My daughter's birthday was in May - like many other girls, she's in love with the movie "Frozen" so I tried to do as many DIY decorations that I could.  (I couldn't find ANYTHING in our local stores - it was all sold out!)  I made these great tissue paper garlands using turquoise, purple, silver and polka dot tissue papers.  In the background you'll see the birthday craft - making snowmen!
 This was my first attempt at using a pool noodle as the wreath form - it didn't work very well!  See how it's an oval shape rather than a circle?  Oh well - it turned out cute all the same.


 The birthday girl and a few friends - I used a shower curtain as the backdrop to her cake table and made the birthday garland using simple latter printables found online.
 This fun tooth fairy pillow was made to capture my daughter's FIRST loose tooth!
 This was my first 'back into my groove' handbag that I ended up selling from my Etsy shop.  I loved the print of the exterior fabric - the combination of the pink, coral, gray and green.
 I quickly made this tote to give to my secret sister at MOPS.  I hope she liked it - her favorite color is turquoise so I thought it would be perfect.
 A good friend that I used to work with has asked me a few times now to make personalized wreaths for her to give as baby shower gifts.  This little guys Daddy is a big Auburn fan so we made it to show some school spirit!
 Another friend asked me to make some bunting for her sister's baby girl - they were able to use this as decoration for her baby shower and then it's going up in her nursery too.  It turned out so sweet!
 A long time ago another friend asked if I could make a colorful birthday bunting that they could use for every birthday in their house - boys and girls alike.  I thought this rainbow chevron was a great background and fit the bill perfectly!
 Lots of custom work lately - a local friend asked me to make some pillow covers for pillows she's putting on her outdoor chairs.  This bright yellow floral is sunny and bright.
This was my first fabric rag wreath and I LOVE IT!  I followed some directions I found on Pinterest and a metal wire wreath form.  I just cut a TON of 1"x7" strips out of red, white and blue fabric I found at WalMart then spent a couple of hours tying them onto the form.  I think next time I'll cut the strips a bit longer - 8 or 9 inches long instead.  It is the perfect addition to my front door for the upcoming Fourth of July holiday though!

And here are some new items for sale in my Etsy shop - check out www.pursewna.etsy.com for more details!
one length of garland - 3 feet long $8.00
turquoise herringbone handbag $22.00
brown floral tote $20.00
Pink Mosaic Tile Handbag $22.00
Navy Blue Handbag $22.00
Red Chevron Handbag (large) $25.00


Decorating-wise, my laundry room is done and fantastic... I just need to get around to taking some pictures of it.  I hope to get some photos up soon!  Not to mention new owls and handbags in the shop soon too!


Thursday, March 20, 2014

Silverware Artwork

Being in a new house has some challenges - obviously.  I'm not a very patient person (cue the 'no kidding' comments) and I want things to be done 'now'!  It's been hard to wait things out until I find the right piece of wall art or the right piece of furniture.  Also, I'm working hard to be thrifty - especially when it comes to the artwork and wall decor.  One project that turned out really great (I think) is this one:
yes, I know - awful picture again!  maybe I need to take some photography classes....
Silverware Art!  This was a super easy project and it really did turn out great.  I found lots of great inspiration via Pinterest - great websites/blogs like:  spunkyjunky.blogspot.com.

Supplies:
wall frames (these were at Hobby Lobby for 50% off - about $5 each)
thrifted silverware (25cents per piece at my local thrift store)
scrapbook paper/fabric (I used scrapbook paper from Hobby Lobby)
spray adhesive
strong glue like E600

First - spray paint your silverware.  I used a glossy black by Krylon.  I did get a little overzealous painting and ended up having to use a black Sharpie to do touch up (shhh.... don't tell!)

Second - cut your scrapbook paper/fabric to fit inside your frame.  I used spray adhesive and sprayed the cardboard insert from the frame (I put the glass in our recyle bin - no need to keep it, heaven knows it'd just end up broke anyhow) then pressed the paper down on top of it.  I did have to do some trimming to get it to fit just right.

Third - glue your silverware directly onto your scrapbook paper/fabric backing.  Let it dry for awhile before you hang these on the wall so you can tell they're secure.

Fourth - hang up on your wall and enjoy your thriftiness and craftiness!!!!